Rear disc brake pads offer better performance and are not as affected by moisture like conventional brake shoe style brakes are. Rear disc brakes are similar to front disc brakes. The main difference is that rear disc brake systems must incorporate the parking brake system. There are two methods widely used for the emergency brake with rear disc systems. The first system is a brake shoe inside the brake disc that is actuated by the emergency brake lever. The second is a screw style actuator inside the brake caliper. When activated the brake pads are forced into the brake disc and held tightly by the emergency brake lever.
Step 1 - Identify Rear Disc Brake Components

Rear Disc Brake Identification
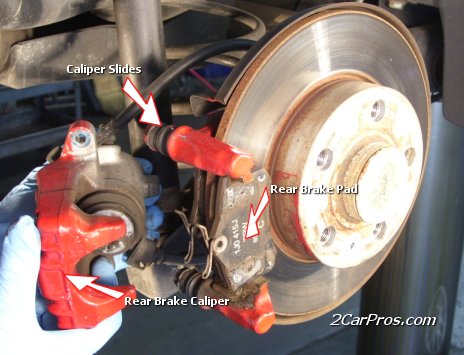
Rear disc brake assembly includes; rear brake disc, rear brake pads, brake caliper mount and a caliper mounting screw. (Note: Some vehicles do not have the rotor mounting screw.)
Step 2 - Removing the Rear Brake Caliper Mount Bolts

Locate Rear Caliper Mount Bolts
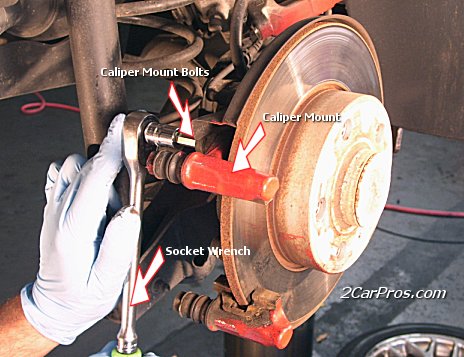
To replace rear brake pads and rotors the rear brake caliper needs to be removed. First loosen the rear brake caliper mount bolts and remove them. Turn counter clockwise.
Step 3 - Lift Rear Brake Caliper from The Caliper Mount

Remove Rear Caliper
After the caliper mount bolts have been removed, gently lift the brake caliper from the caliper mount. Inspect the caliper slides; they should move freely in the caliper mount. Remove rear brake pads and hardware.
Step 4 - Removing Caliper Mount Bolts

Remove Rear Caliper Mount Bolts
With a socket wrench or other appropriate removal tool, loosen the rear brake caliper mounting bolts. Remove bolts and lift the caliper mount and remove it from the vehicle. Remove the retaining screw from the disc mounting hole. Tap the rotor gently to release any rust that has accumulated between the rotor and bearing hub. Lift brake rotor from wheel hub holding on tightly, using both hands. You do not want to drop the rotor.
Step 5 - Removing Rear Brake Rotor

Remove Rear Brake Rotor
Remove the retaining screw from the disc mounting hole, tap the rotor gently to release any rust that has accumulated between the rotor and bearing hub. Lift brake rotor from wheel hub, hold on using both hands and do not drop.
Step 6 - Install New Brake Rotor

Check the new rotor against the old brake rotor to make sure they are the same size. Clean the matingsurface on the wheel hub before the new brake rotor is installed. Reinstall rotor retainer screw.
Step 7 - Reset Rear Brake Caliper

Using a Rear Caliper Reset Tool
Before new brake pads can be installed, the rear brake caliper must be reset. The reset tool winds the piston back into position so the new brake pads will fit. This style of brake caliper will not compress with a clamp tool; it can only be reset with the proper reset tool.
Step 8 - Reinstall Rear Caliper Mount and Install New Rear Brake Pads

Reinstall Rear Caliper Mount with New Rear Brake Pads
After the caliper has been reset, reinstall caliper mounting bolts and make sure the bolts are tight. Then match up the old brake pads to the new brake pads. They should be exactly the same except, of course; the old ones will be worn out. Check the new brake pads for proper fit and install any brake hardware that is required.
Step 9 - Remount Rear Brake Caliper

Reinstall the brake caliper, align brake pad hardware and reinstall caliper mounting bolts. (Note: align the rear peg of the brake pad to the groove in the caliper piston.) Recheck and retighten all caliper and caliper mount bolts. Bleed brake system to relieve any air in the system. Before driving the vehicle, push the brake pedal down and let it up slowly. This operation forces the brake pads to travel to the brake rotors. DO NOTDRIVE VEHICLE until proper brake pedal operation resumes. When test driving vehicle listen for any unusual noises during the operation of the brakes.
Common Problems
- Brake pads wear down too far contacting the rotor making a grinding noise.
- Caliper slides lock up not letting the caliper move causing one brake pad to wear out and not the other.
- If inferior parts are used they will squeak, grumble and not last as long.
Rear Brake Parts
 | Rear Brake Pad - Semi metallic brake pads are generally made copper, brass, and steel wool shavings held together in a resin. Ceramic pads are also available for high performance applications. |
 | Rear Brake Caliper - Brake calipers provide the squeezing power to the brake pads when you press the brake pedal down. Whether using standard master cylinder or ABS braking systems, brake calipers apply the pressure from the pads to the rotors. |
 | Rear Brake Rotor - A brake disc is the rotating part of the braking system that contacts the brake pads. Heat and energy are transferred from the brake disc to the pads while providing friction to stop the car. Cross drill brake discs help dissipate heat more efficiently under extreme driving conditions like long down grades or repeated hard accelerations and decelerations. |
 | Brake Master Cylinder - The brake master cylinder supplies brake fluid pressure to the brake system. |
If further assistance is needed, our certified car repair technicians are ready to answer your car questions. Also, gain manufacturer specific instructions and information by clicking - Auto Repair Manual


It is a proficient article that you have shared here. I got some different kind of information from your article which I will be sharing with my friends who need this info. Thankful to you for sharing an article like this.Rear disc brakes NZ
ReplyDeleteNice Post. Thanks for Sharing
ReplyDeletesuspension parts manufacturers in India
Best Automobile Part Manufacturers in India
Shock Absorber Manufacturers in India
Brake Shoe Manufacturers in India
Brake Manufacturers in India
Car Suspension Parts Manufacturers in India
Universal Joint Cross Manufacturers
Bearing Manufacturers
Brake Shoe Manufacturers
Wiper Blades
This blog provides great insights into the world of cars, from tips on maintenance to buying and selling.
ReplyDeletebrake pads nz